
That Sickening Winter Draft and the Bill That Made Me Freeze
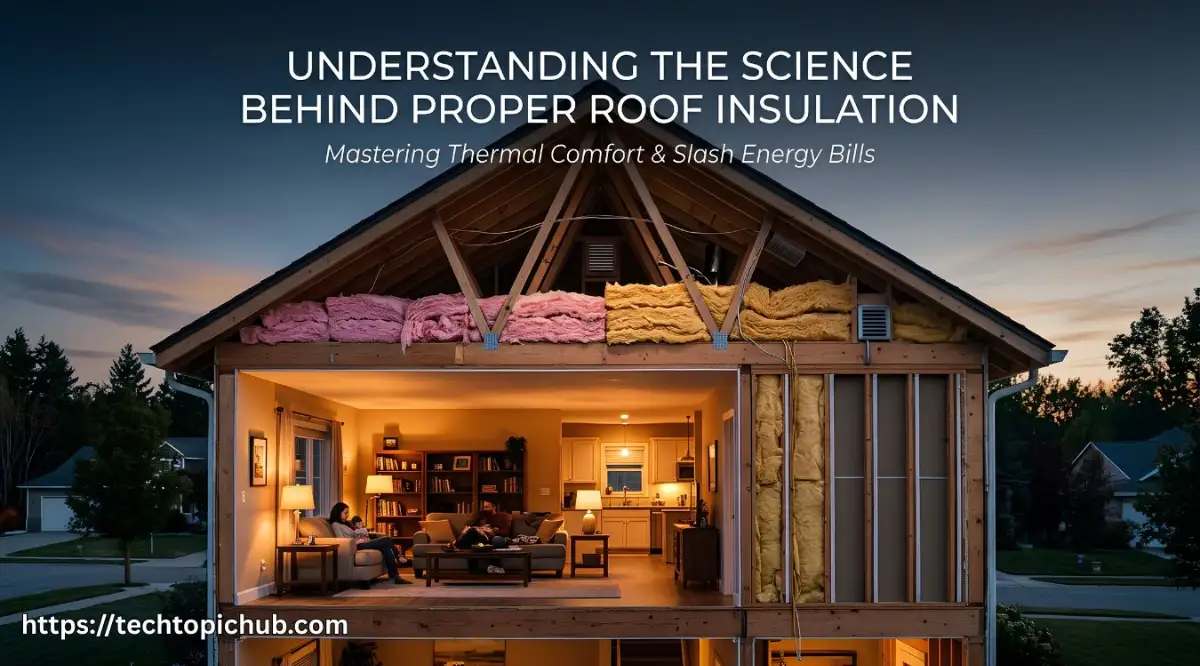
Most homeowners obsess over kitchen backsplashes and trendy paint colors when planning their weekend home improvement projects. However, if your upstairs bedrooms feel like a walk-in freezer in January and a pizza oven in July, cosmetic upgrades will not solve the issue. True comfort starts overhead with proper roof insulation, where an airtight barrier stops conditioned indoor air and hard-earned cash from slipping straight through your ceiling joists.
I still remember staring at my utility bill on a damp Tuesday morning. My hands were literally shaking because the total cost was almost double what I had planned for our family budget.
My furnace had been roaring night and day without taking a single break. Yet, whenever I walked up the stairs to our master bedroom, the floor felt like an ice rink.
I honestly felt like an absolute failure as a homeowner. I thought buying a new thermostat would magically fix the cold spots, but nothing changed.
The heat simply refused to stay inside the living space. Every hard-earned dollar I spent on heating was running straight out through the top of my house.
Instead, you get uneven rooms, sleepless nights, and a knot in your stomach when the utility envelope lands in your mailbox. It drains your patience, steals your comfort, and creates quiet tension between family members who just want to feel cozy inside their own home.
The worst part is the helpless feeling of not knowing where that expensive conditioned air is escaping. You feel like your house is working against you, no matter how hard you work to pay for utilities.
 The Invisible Physics Happening Above Your Ceiling Every Second
Key Takeaways: What You Must Know About Attic Efficiency
· Stop Air Flow First: Standard insulation materials resist conductive heat but allow air currents to pass straight through; air-sealing cracks is step one.
· Preserve Eave Airflow: Installing thermal roof insulation without clear rafter baffles blocks soffit vents, trapping damp air and creating destructive winter ice dams.
· Counteract the Stack Effect: Warm indoor air rises naturally like a hot-air balloon; capping top plates keeps heated air inside your living quarters.
· Balanced Upgrades Win: Pairing proper sealing with balanced soffit-to-ridge venting can reduce your seasonal heating and cooling power draw by up to 25%.
Most homeowners look at their ceilings and see flat, quiet drywall covered in white paint. What you are actually looking at is a battleground governed by strict laws of thermodynamics.
Heat never stays still; it is an aggressive, restless traveler that always moves toward the cold. If your ceiling lacks adequate resistance, your home turns into an open chimney during winter and an oven during summer.
Understanding how heat moves across your attic space changes the way you look at comfort forever. Scientists divide heat movement into three simple pathways: conduction, convection, and radiation.
--------------------------------------------------------------------------
HOW HEAT ESCAPES YOUR HOME
------------------------------------------------------------------------
| Heat Mechanism | Real-World Attic Example
-------------------------------------------------------------------------
| Conduction | Heat passing through solid wood joists & drywall
| Convection | Warm indoor air rising up through electrical holes
| Radiation | Sun rays baking down on black asphalt shingles
------------------------------------------------------------------------------
The Heavy Punch of Conduction
Conduction is the direct transfer of thermal energy through solid physical materials. Think of touching a metal spoon that has been resting inside a pot of boiling soup.
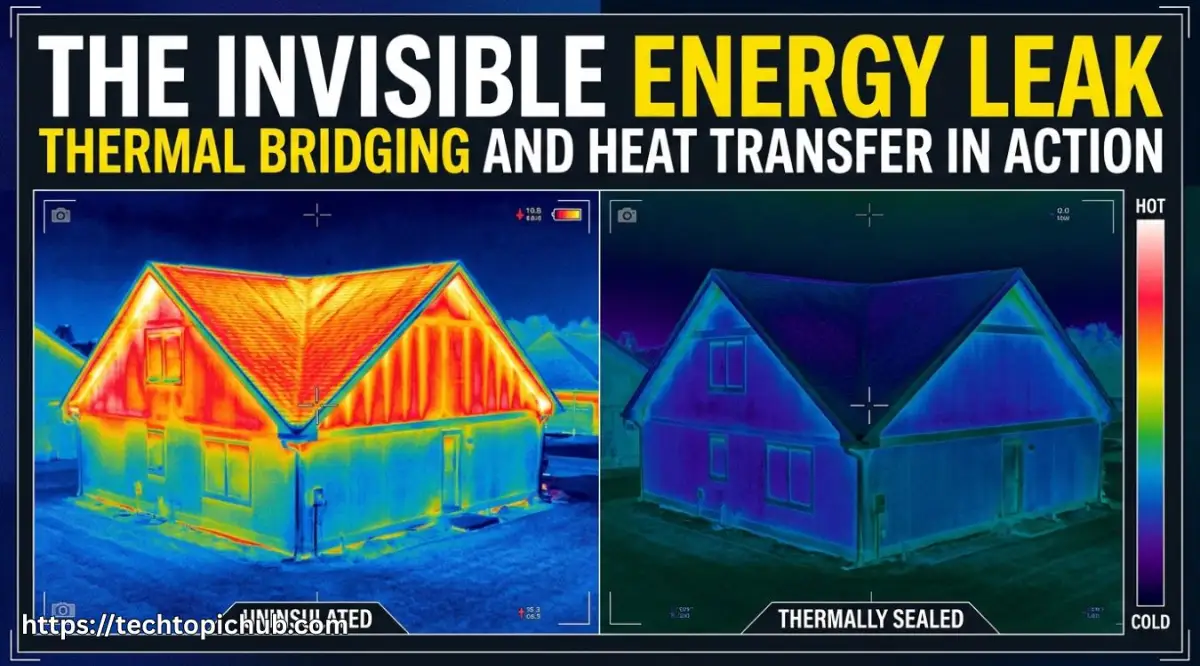
In your home, heat from your warm ceiling directly transfers through the drywall sheets into the wooden joists. Solid framing lumber is an easy pathway for this heat to travel across.
This process is known as thermal bridging, where your wood framing acts as a highway for thermal energy to bypass weak spots. Without proper roof insulation, your attic floor becomes a massive heat conductor that bleeds warmth into the sky.
Convection and the Annoying Stack Effect
Convection is the physical movement of heat through liquids and gases, especially air. Warm air naturally expands, becomes lighter, and rises toward the highest points of your house.
As that warm air rushes upward, it creates negative air pressure near the bottom floors of your home. This suction pulls freezing drafts through gaps under your doors, around window trims, and through basement cracks.
Building scientists call this ongoing cycle the stack effect. The faster heat escapes through an unprotected roof, the more freezing air your lower floors pull inside.
Radiant Heat: The Summer Ceiling Baker
Radiation does not require air or solid contact to move thermal energy. Radiant heat travels in straight electromagnetic waves until it hits something solid and warms it up.
During midsummer, the sun hits your dark asphalt shingles with relentless radiant power. Those shingles absorb that energy, raising roof temperatures well beyond ambient outdoor levels.
That intense heat radiates downward through the roof deck, baking everything in the attic like a pizza oven. That downward radiant energy pushes directly down into your bedrooms, forcing your air conditioner to work double shifts.
Demystifying R-Values: What the Numbers Actually Tell You
Whenever you browse building materials, you see the letter R followed by a specific number printed on batts and boards. The "R" stands for thermal resistance, which measures how well a material stops the flow of conductive heat.
The higher the R-value, the better that material resists thermal movement through its structure. However, doubling the thickness of an insulating material does not always produce double the actual energy savings.
The Law of Diminishing Returns
Many people assume jumping from an R-15 to an R-60 will save four times the energy. The physics of heat transfer follows an inverse curve rather than a straight line.
An uninsulated attic floor loses heat at an alarming rate, so adding the initial layer produces massive improvements. The first few inches of insulation do roughly eighty percent of the heavy lifting.
Adding more depth beyond standard recommended thresholds still yields value, but the percentage gain shrinks with each extra layer. You want to aim for the sweet spot recommended for your climate zone without wasting funds on unneeded depth.
|
Common Attic Insulation Myth |
The Engineering Reality |
Smart Homeowner Takeaway |
|
Myth 1: Piling on twice as much insulation doubles your total savings. |
Thermal physics follows an inverse curve; the first few inches block 80% of conductive loss. |
Match your local climate zone target instead of wasting cash on extreme depth. |
|
Myth 2: Thick fiberglass batts stop cold winter drafts on their own. |
Fibrous batts act like air filters; moving air passes right through unsealed fibers. |
Always seal ceiling penetrations with foam before laying down any bulk insulation. |
|
Myth 3: Simply adding extra rolls fixes cold drafty rooms instantly. |
True success in reducing heating and cooling costs with roof insulation requires air-sealing, ventilation, and depth working together. |
Balance your thermal barrier with clear soffit vents to keep moisture and drafts out. |
Why R-Value Alone Can Lie to You
A package might boast a certified rating of R-38 right on the plastic wrapping. That rating only holds true under perfect laboratory conditions with zero moving air.
If cold attic drafts blow directly across loose fiberglass fibers, the effective resistance drops like a stone. Air wash strips away trapped pockets of warm air, rendering the material far less efficient.
True thermal protection requires two things working together: airtight sealing and solid thermal resistance. A high R-value without an air barrier is like wearing a thick wool sweater in a blustery snowstorm without a windbreaker.
The Secret Enemy: Air Infiltration and Thermal Bridging
Most people run out and pile fluffy insulation directly over their attic floors, expecting instant comfort. They end up disappointed when their energy bills barely budge the next month.
The reason is simple: standard insulation materials do not stop moving air. Fiberglass batts and loose cellulose are like air filters; air passes right through them unless you seal the penetrations beneath.
Plumbing Stacks, Wires, and Dropped Soffits
Every time an electrician runs a wire or a plumber installs a pipe, they drill holes through the wooden top plates of your walls. These small holes create direct highways between your conditioned living spaces and your attic.
Recessed can lights, bathroom vent fans, and attic access hatches also create wide gaps in your home envelope. Warm air rushes through these tiny openings, bypassing your fluffy insulation completely.
"Want to see how heat actually escapes right beneath your nose? Watch this quick thermal camera walkthrough to spot the exact leak zones, and then keep reading below to fix them with simple tools."
Stopping the Attic Bypass Route
Before you roll out blankets of fiberglass or blow cellulose across the joists, you must seal every crack. Expanding spray foam, fire-rated caulk, and rigid foam board are your best allies here.
Walking your attic space with a flashlight and a foam gun reveals shocking gaps. You will often see black stains on old fiberglass insulation near ceiling penetrations.
Those dark spots are not dirt or mildew; they are soot and dust filtered out of your living air over decades. Sealing these bypasses keeps heated air where it belongs: inside your living room.
My Costly Air-Sealing Realization:
When I tackled my first attic project, I bought twenty bags of blown-in insulation and skipped air-sealing because I was in a rush. That winter, my utility bills dropped by barely ten dollars, and cold drafts still swept under my bedroom door. I had to climb back into that dusty space, move pounds of insulation out of the way, and seal the wall plates properly. Taking the time to seal air leaks first made all the difference in the world.
My 5-Minute Incense Stick Air-Leak Test:
Before buying more insulation, grab a lit incense stick or a thin smoke pencil on a windy afternoon. Slowly trace around your ceiling light trims, the edges of your attic hatch, and your bathroom fan covers. If that steady line of smoke suddenly wavers or gets pulled upward, you have pinpointed an invisible ceiling chimney. Sealing that specific spot with a five-dollar can of expanding foam is the quickest way to unlock real roof insulation energy savings.
Comparing Insulation Types: Finding Your Ideal Match
Not all thermal materials perform the same tasks or fit the same roof designs. Choosing the right material depends on your attic layout, your climate, and your renovation budget.
------------------------------------------------------------------------------------------------
POPULAR ROOF INSULATION MATERIALS
------------------------------------------------------------------------------------------------
| Material Type | R-Value Per In. | Best Use Scenario | Big Advantage
------------------------------------------------------------------------------------------------
| Fiberglass Batts | R-2.9 to R-3.8 | Standard Joist Spacing | Inexpensive & easy to place
| Blown Cellulose | R-3.5 to R-3.8 | Irregular Attic Floors | Fills tight cracks and gaps
| Spray Foam (Open) | R-3.6 to R-3.9 | Roof Deck Rafters | Seals air and insulates at once
| Spray Foam (Close) | R-6.0 to R-7.0 | Shallow Rafter Spaces | Built-in vapor barrier + density
| Rigid Foam Board | R-4.0 to R-6.5 | Cathedral Ceilings | Stops thermal bridging cold
------------------------------------------------------------------------------------------------
Fiberglass Batts and Rolls
Fiberglass remains the most common choice found in neighborhood home improvement centers. It is lightweight, non-combustible, and relatively affordable for homeowners taking on projects themselves.
The challenge with batts is the fit. If you leave a small gap next to a rafter, heat bypasses the batt with ease.
You must cut batts carefully around cross-bracing and electrical boxes without compressing the glass fibers. Squishing fiberglass to force it into tight gaps ruins its insulating value by removing air pockets.
Blown-in Cellulose
Cellulose consists of shredded recycled paper treated with non-toxic borate minerals for fire and pest resistance. A machine blows this loose-fill material through a flexible hose directly into your attic space.
Cellulose flows around obstacles like pipes, wires, and odd joist bays, filling every nook seamlessly. It tends to settle over several months, which must be accounted for during initial depth measurements.
Because cellulose packs tighter than fiberglass, it restricts airflow naturally without needing extra plastic membranes. This density gives it great performance during freezing winter snaps.
Spray Foam Insulation
Spray polyurethane foam expands rapidly upon application, filling every tiny gap and void instantly. Open-cell foam expands significantly and acts as a superb sound barrier and air seal.
Closed-cell foam is much denser, offering the highest R-value per inch of any common residential option. It also acts as a built-in moisture vapor barrier and adds structural rigidity to roof rafters.
Spray foam costs more than fibrous options and requires careful professional handling. However, it lets you create an unvented, conditioned attic space where you can place ductwork without suffering thermal losses.
The Moisture Equation: Why Breathability Protects Your Structure
Insulating a roof is not just about keeping thermal energy locked in place; you must also manage water vapor. Human activities like cooking, showering, and washing dishes generate gallons of airborne water vapor daily.
Because of the stack effect, this invisible humidity rises upward toward your attic framing. When warm, humid air hits cold roof sheathing, it condenses into liquid water drops.
The Terrors of Hidden Attic Condensation
Liquid water on bare plywood creates the perfect breeding ground for destructive wood rot and mold colonies. Wet insulation also loses its ability to resist thermal flow, speeding up heat loss.
If your insulation gets soggy, its R-value plummets toward zero. Worse yet, moisture can drip down onto your ceiling drywall, causing yellow stains and costly structural damage.
Proper thermal strategies always pair adequate resistance with smart moisture management. You never want to seal an attic space without understanding how moisture moves in and out.
Balanced Ventilation: Soffits and Ridge Vents
In a traditional vented attic setup, cold outside air enters through soffit vents cut beneath the roof eaves. That air travels up beneath the roof sheathing and exits through a continuous ridge vent along the roof peak.
This steady current of cool, dry air sweeps out lingering moisture before it has a chance to condense. It also keeps your roof deck cool during sunny winter afternoons, which prevents destructive ice dams from forming.
Cold Air Exits Out Through Ridge Vent
^
/ \
/ \
/ \
Cold Deck / Attic \ Cold Deck
/ Space \
/ \
/ Insulation \
Soffit Intake=============== Soffit Intake
Cold Air In Cold Air In
Install plastic baffles or rafter vents at every eave before laying down new insulation. These baffles prevent your insulation from blocking the soffit vents, keeping fresh airflow completely unobstructed.
Systematic Attic Thermal Assessment
Before buying a single roll of insulation, you need an accurate evaluation of your existing roof space. Grabbing a simple tape measure and a strong flashlight gives you the answers you need in minutes.
One expensive mistake I made early on was buying piles of new insulation before checking where air was actually slipping through. If you do not seal the small wire holes and ceiling joints with foam first, you are throwing blankets over an open window. Take it from me: find and seal those hidden cracks first, and your materials will work twice as hard for you.
Measure Your Current Depth
Climb up your attic hatch and measure the thickness of your existing insulation layer with a wooden ruler. If you can see the tops of your ceiling joists exposed, you have less than six or seven inches of material.
Most modern residential guidelines recommend between twelve and eighteen inches of total insulation depth, depending on your geographic region. If your insulation sits flush with the joist tops, you are losing cash every heating cycle.
Inspect for Hidden Air Channels
Move your flashlight around the perimeter of the attic floor to spot missing air dams or collapsed insulation batts. Check the flashing around your chimney and make sure it has fire-safe sheet metal sealed with high-heat silicone.
Take a close look at the drywall joints around your dropped hallway soffits and bathroom exhaust fans. These drop-down ceiling features are notorious for letting heated indoor air leak straight into the attic.
Check the Ductwork Running Through Cold Spaces
If your furnace or air handler sits inside an unconditioned attic, pay special attention to those sheet metal trunks. Ducts carrying conditioned air through a freezing attic lose enormous amounts of energy through basic thermal exchange.
Make sure every duct seam is taped tight with mastic sealant rather than standard cloth duct tape, which dries out and falls off. Insulate all exposed duct runs with specialized foil-faced fiberglass wraps to stop conditioned air from cooling off before it reaches your bedroom.
Real-World Math: Calculating True Return on Investment
Upgrading your attic thermal boundary is one of the few home improvement projects that pays you back month after month. Unlike a fancy kitchen countertop or fresh paint, thermal barriers put real cash back into your bank account.
Slashing Your Monthly Utility Bills
Most homes with updated attic insulation see heating and cooling energy usage drop by fifteen to twenty-five percent. If you spend three hundred dollars a month on heating and cooling, a twenty percent reduction saves you s